
Mastering Affinity Designer:
The Photoshop & Illustrator Alternative You’ve Been Looking For
📅 Published on:7/10/2025
✍️ By: Risto @ Creativa Forge
📬 Have questions? Email me at [email protected] | Title Blog Questions
When I first explored Affinity Designer, I didn’t expect to get emails about it. However, here we are, with two readers who have reached out with questions. That might not sound like much, but for a blog that’s just starting to build its SEO footprint, that’s huge. And honestly, I get it.
If you’re in the same spot I was looking for alternatives to Adobe, wondering if Affinity is good enough, questioning whether it’s a real competitor to Photoshop or Illustrator, this post is for you.
We’re diving deep into Affinity Designer, the most versatile app in the Affinity Suite (which also includes Affinity Photo and Affinity Publisher). We’ll cover tools, layout, use cases, and how it compares to Adobe. I’ll even leave you with useful resource links at the end.
🤔 Why Look for an Alternative to Adobe?
Like many creatives, I started on Adobe. But here’s the truth: Adobe’s subscription model doesn’t fit everyone’s workflow or budget. I was paying for programs I rarely used there was no option to just subscribe to Illustrator or Photoshop affordably. So I asked myself:
Can a one-time-purchase program really compete?
Will I miss Adobe’s features?
Can I do everything I need, logos, web mockups, vector art, print layouts, etc, in one tool?
That led me to Affinity. Spoiler alert: Yes, it can. Let’s break down why.
🎯 What Is Affinity Designer?
Affinity Designer is a vector-based graphic design tool, similar to Adobe Illustrator but with a twist: it also includes raster tools, giving you hybrid power that Adobe splits across two apps. Whether you’re working on:
✅ Logo Design
✅ Icons and UI Elements
✅ Digital Illustrations
✅ Flyers and Posters
✅ Website Mockups
✅ Brand Assets
…Affinity Designer has you covered.
The secret weapon? Pixel Persona – a built-in raster editor that lets you paint, erase, and retouch directly inside a vector file. No need to jump to another app.
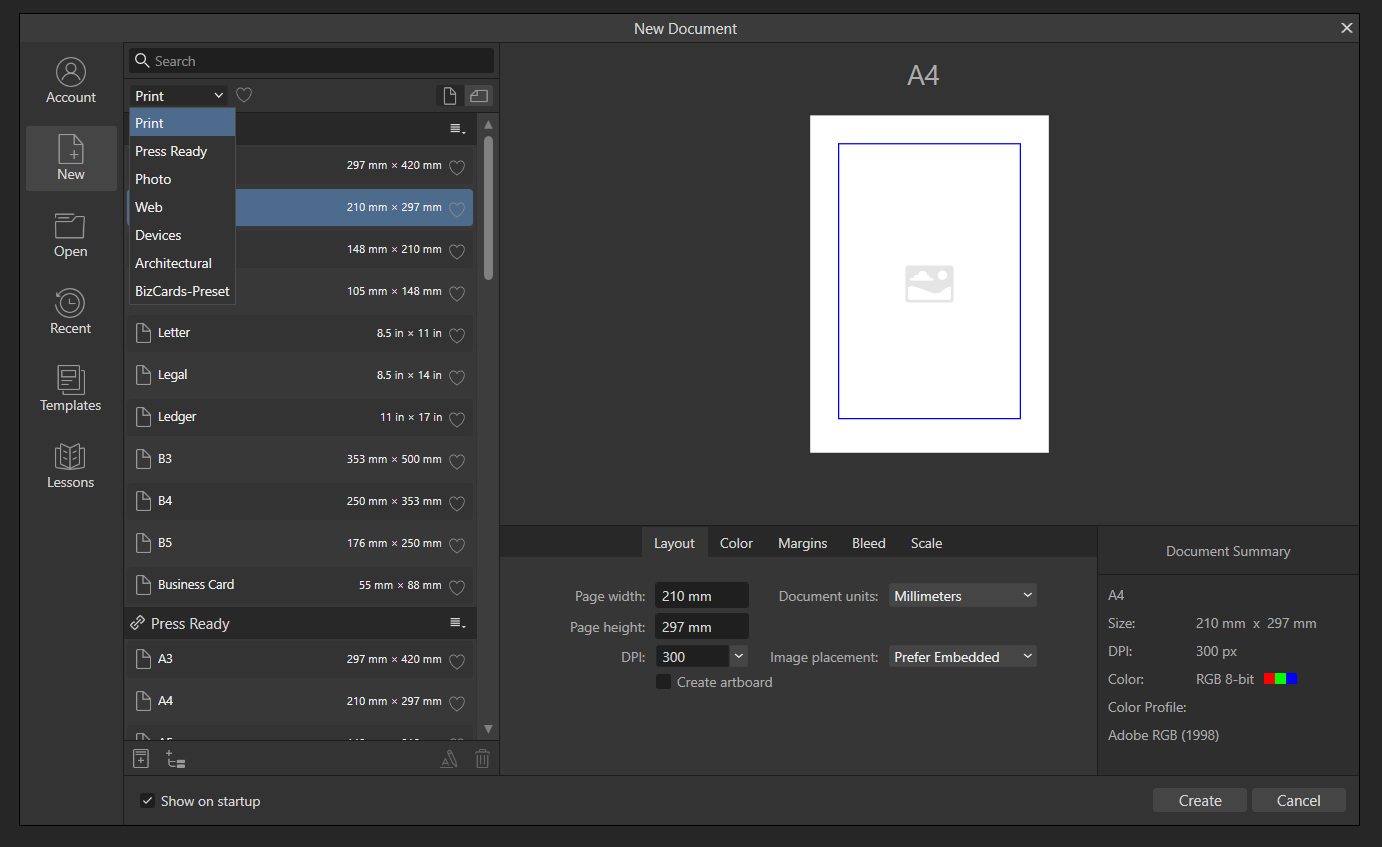
🧰 Starting a Project: Templates, Presets & Color Modes
When you create a new document, Affinity Designer offers a clean and professional setup screen. You can choose:
🖨️ Print formats (A4, Letter, etc.)
🌐 Web presets with screen resolutions
🎨 Color modes like CMYK, RGB, and even Color Profile Adobe 1998.
It’s great to see that kind of flexibility, especially if you’re transitioning from print to digital or vice versa.
It has options for presetting and save the documents that you are using as templates so you can select them at startup.
You can save your workspace profile, it does not matter if you are using it for web design graphics, or creative drawing. Affinity simply has all the tools you need.
🛠️ The Affinity Designer Toolkit: Everything at Your Fingertips
The Affinity Designer layout feels familiar if you’ve used Photoshop or Illustrator, but there are a lot of thoughtful design decisions that make it surprisingly refreshing.
Let’s walk through the key areas and what you can do with them.
🔧 Tools Panel (Left Side)
The Tools panel is presented vertically on the left side of your workspace. It contains all the tools available in the currently active Persona (Designer, Pixel, or Export).
These tools are fully customizable you can remove or add what you use most. Below the tools, you’ll find stroke and fill selectors along with a swap arrow something Illustrator users will feel right at home with.
Here are some standout tools:
✏️ Pen Tool – Ideal for precise vector drawing, paths, curves, and logos
🖌️ Brush Tool – Paint directly with raster or vector brushes (depending on the Persona)
⛅ Gradient Tool – Quickly apply gradients with intuitive controls
🅰️ Text Tool – Create artistic or frame text, control kerning, line spacing, and more
🔺 Shape Tool – Draw basic and complex geometric shapes, with adjustable corners and options
🩹 Vector Crop / Eraser / Smudge Tools – Tools vary by Persona and context

🧰 Toolbar (Top Center)
The Toolbar includes commonly used functions and view controls, logically grouped for quick access. Here’s a breakdown of its most useful features:
🧩 Defaults
Synchronize defaults to current object– Quickly save the style of the current objectReset document defaults– Revert to saved default settings
🖥️ Viewing Modes
Pixel View Mode– See your design as it would appear pixel-perfectRetina Pixel View Mode– Preview how it looks on high-DPI displaysWireframe View Mode– See only object outlines for a clean layout overview
🔃 Object Ordering
Move to Front / Back– Layer objects easilyForward One / Back One– Fine-tune object stacking
🔄 Transform
Flip (Horizontal/Vertical), Rotate (90°) – Great for quick layout adjustments
📏 Alignment
Align to Selection, Spread, Page Margin, etc. – With smart distribution and snapping controls
📐 Snapping & Pixel Alignment
Force Pixel Alignment– Ensures crisp vector placementMove by Whole Pixels– Perfect for UI/icon workSnapping Options– Customize how objects interact with each other
🧪 Boolean Operations
Add– Merge shapes into oneSubtract– Cut one object out of anotherIntersect,XOR,Divide– Advanced shape creation made simple
🎭 Persona Toolbar (Top Left)
One of Affinity’s biggest strengths is the Persona switcher. It lets you switch between:
Designer Persona – For creating and editing vector graphics
Pixel Persona – Access raster tools for photo editing and digital painting
Export Persona – Prepare your assets for web or print with slices, formats, and scaling
This lets you do vector + pixel editing in one app, unlike Adobe where you’d jump between Illustrator and Photoshop.
🧠 Context Toolbar (Below Top Toolbar)
This is the smartest part of the UI—it updates automatically based on your selected tool.
For example:
With the Pen Tool, you’ll see path modes and snapping toggles
With Text Tool, you’ll get font choices, alignment, spacing
For Shapes, it shows corner types, radius, and geometry options

🔍 Feature Highlights That Matter
Here are a few things I personally love:
✅ Force Pixel Alignment – Great for UI and icon design
✅ Wireframe Mode – Quickly visualize layout structures
✅ Object Operations (Add, Subtract, Intersect) – Works beautifully for logo building
✅ Precision Transform Controls – Rotate, flip, align, scale with pixel accuracy
✅ Export Persona – Export assets in different formats and resolutions with ease

💡 Is It Really a Replacement for Illustrator?
For most design work? Absolutely.
Is it 100% identical? No. But after 15 years of using Illustrator, I’d say Affinity Designer gets very close—and in some cases, even does things better.
If you’re primarily doing UI, branding, or web design mockups, this might be the tool you’ve been waiting for.
Also: the learning curve is low. You’ll pick it up fast, especially if you’ve used Adobe before.
📌 Final Thoughts: A Designer’s Tool That Just Works
I’m not here to bash Adobe many of us still use it. But Affinity Designer gives you freedom, flexibility, and power, all for a one-time payment. It’s a budget-friendly, creative-friendly tool that deserves more attention.
And this post only scratches the surface. In upcoming posts, I’ll dive deeper into the Pixel Persona, Export Persona, and advanced features like symbols, constraints, and asset management.
🔗 Useful Links & Resources
💬 Got Questions?
If you’re curious about a specific feature or want a tutorial on something, don’t hesitate to reach out:
📧 [email protected]
Let’s build something amazing together.
🖋️ Coming Soon on Creativa Forge:
Pixel Persona Deep Dive
How to Create Responsive Web Mockups in Affinity
Export Persona & Asset Optimization Tips
Creating Logos from Scratch: Affinity vs Illustrator